
Setting up a new system is a matter of choosing the right components for your system. You will have to set up some drivers (if you don’t have them already), format the hard drive and create a user account for your system and the operating system you’ve chosen.
Windows 10 is getting updated to the Anniversary Update and you will notice some changes to its built-in interface. One of the changes you may notice is the new “Network and Internet” interface.
Ivan Yenich expert at solving problems with a passion for all things Windows and an innate curiosity, Ivan immersed himself in understanding the operating system, specializing in drivers and solving driver-related problems.
If he’s not trapped… Read more Updated: 17. June 2024. Published: March 2024
- If a blinking black square appears in Windows 10, it’s probably a graphics error.
- Check your display adapter and update the drivers.
- Perform SFC and DISM scans to clear all errors.
- The last thing you can do is run the system troubleshooter.
We recommend Restoro PC Repair Tool to solve various PC problems: This program fixes common computer errors, protects you from file loss, malware and hardware malfunctions, and optimizes your PC for maximum performance. Fix PC problems and remove viruses in 3 easy steps:
- Download the Restoro PC repair tool, which contains a patented technology (patent available here).
- Click on the Start Scan button to scan for Windows issues that may be causing the PC problems.
- To fix problems that affect the security and performance of your computer, click Repair All.
- Restoro was downloaded by 0 readers this month.
In today’s tutorial, we’ll cover a rather unusual bug in Windows 10. Several users have reported that a flashing black box appears on the screen while using the computer. There are several possible causes for this problem. Rest assured, we will do our best to find the right solutions for them.
How Do I Get Rid of the Black Box in Windows 10?
Check the video adapter drivers
- Press the Windows key + R on the keyboard to bring up the startup window.
- Type devmgmt.msc and click OK.
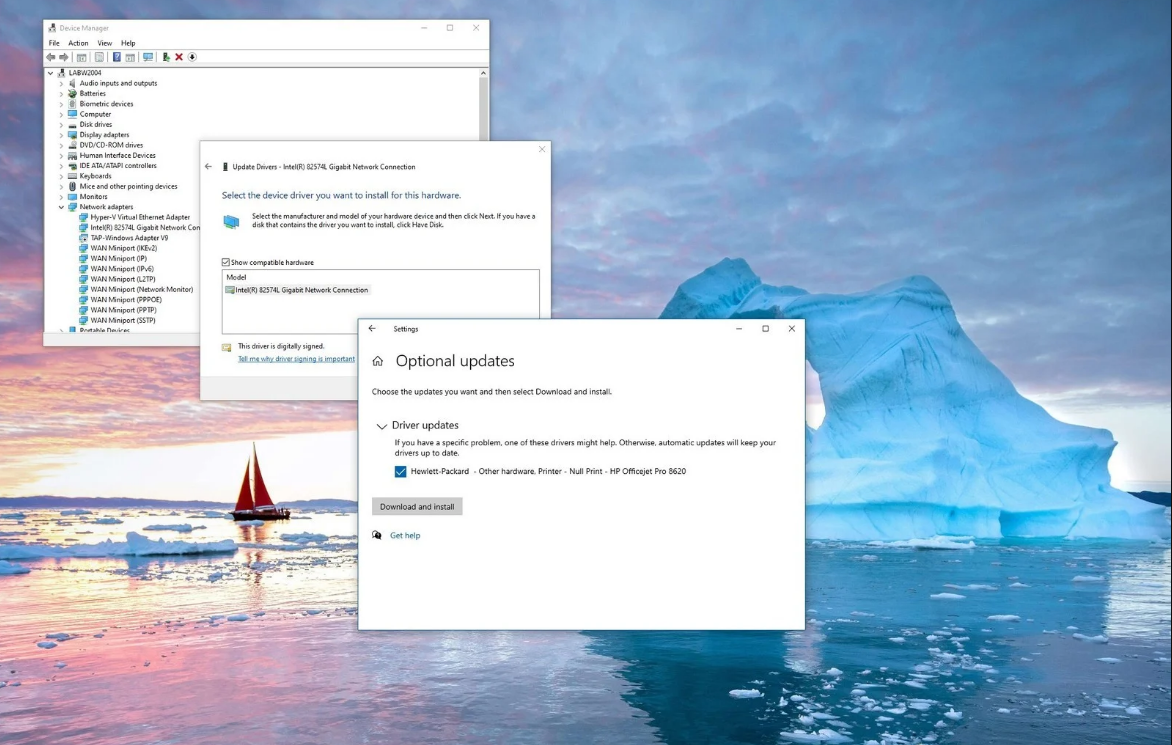
- Find your display adapter and right-click on it.
- Navigate to the Update Driver option.
- If an update is available, let the wizard do it.
- Restart your computer.
At this point, the Windows updates should have covered all your drivers. However, if you are using a display driver for which Microsoft does not provide official updates, you must update the driver automatically. By updating the drivers automatically with a special driver update program, you can save time and update all the necessary drivers easily and safely. Update Results If you are a gamer, photo/video producer, or work with visually intensive processes on a daily basis, you already know how important your graphics card (GPU) is. To ensure that everything goes smoothly and no GPU driver errors occur, it is best to use a comprehensive driver update wizard that will solve your problems in a few clicks. We recommend DriverFix. Follow these simple steps to safely update your drivers:
- Download and install DriverFix.
- Start the software.
- Wait until DriverFix has detected all defective drivers.
- Now the application will show you all the drivers that have problems, and you just need to select the one you want to fix.
- Wait until the application has downloaded and installed the latest drivers.
- Restart the computer for the changes to take effect.
DriverFix
Let your GPU perform at its best without worrying about drivers. Denial: This program must be upgraded from the free version to perform specific actions.
Using DISM control tools
- Right-click in the Start menu and select Command Prompt.
- If the user account prompt appears, click Yes to give the CMD window administrator privileges.
- Type the following line and press Enter : DISM.exe /Online /Cleanup-image /Restorehealth
- Let DISM check your computer for errors and find possible solutions.
It is possible that corrupt system files are the cause of this flashing black box problem. Therefore, you can try to scan your computer for damaged files and repair them. If DISM is not working in Windows 10, read this quick guide on DISM errors in Windows 10 and get it working again.
Perform CFS scan
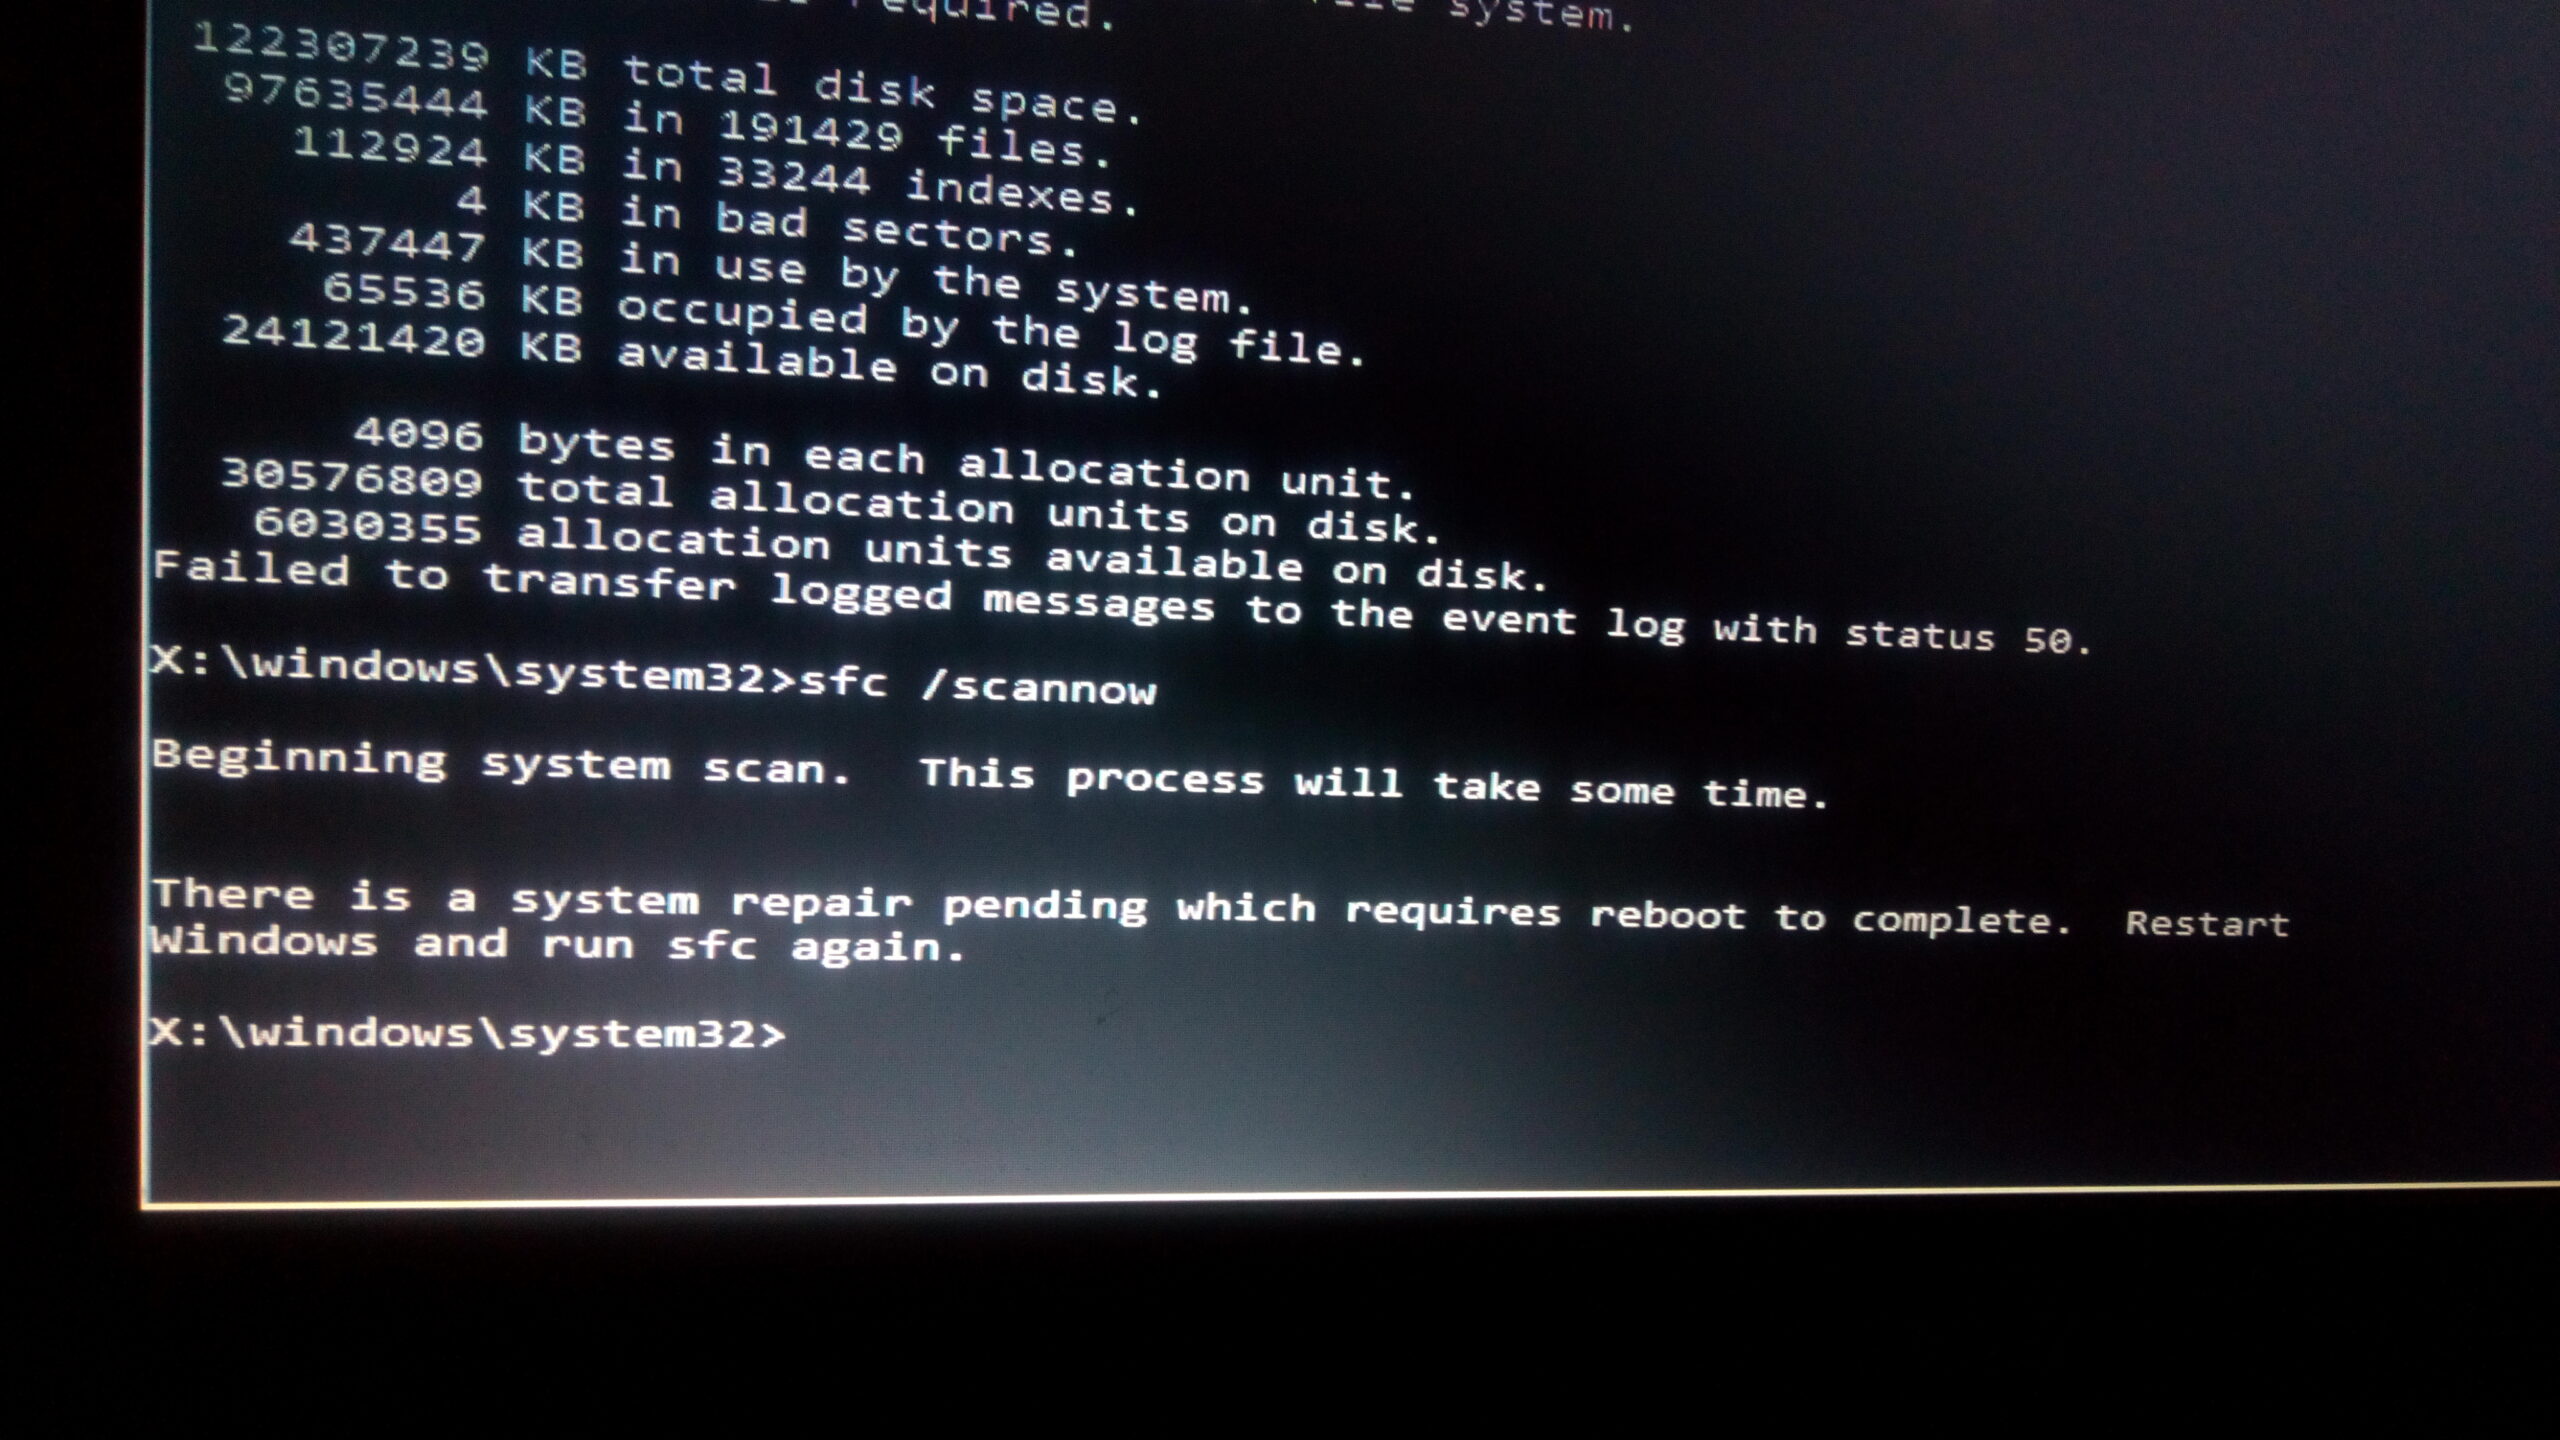
- Go to Search, type cmd and open the command prompt (as administrator).
- Type the following line and press Enter: sfc/scannow
- Wait until the process is complete.
- Restart your computer.
Next, try to run an SFC scan. The system file checker is a built-in feature designed to solve various system problems, so it can help you. Detailed steps for running an SFC scan in Windows 10 can be found above.
Run a system check for errors
Press Start Scan to check for Windows problems. Press Repair Everything to troubleshoot proprietary technology. Run a PC scan with Restoro Repair Tool to find errors that cause security problems and slowdowns. Once the scan is complete, the recovery process replaces the damaged files with new Windows files and components. Did the Scannow team resign before the process was completed? Don’t worry, we have a simple solution for you in this troubleshooting guide.
Troubleshooting
- Go to settings.
- Go to Updates and Security, then Troubleshoot.
- Then click Run Troubleshooter and wait for the process to complete.
- Restart your computer.
Windows Troubleshooter successfully handles a variety of problems, including the blinking black box. However, if you are having trouble opening the Settings application, you can refer to this article to solve the problem.
Disable integrated graphics
- Restart the computer by holding down the SHIFT key.
- The extended Start menu opens at startup. Go to the troubleshooting section.
- Now go to Advanced Settings, then to Startup Settings.
- Click on the Restart button.
- A window will appear with different boot options.
- Press the F5 key on the keyboard to select Enable Safe Mode with Networking.
- Wait for the computer to start up.
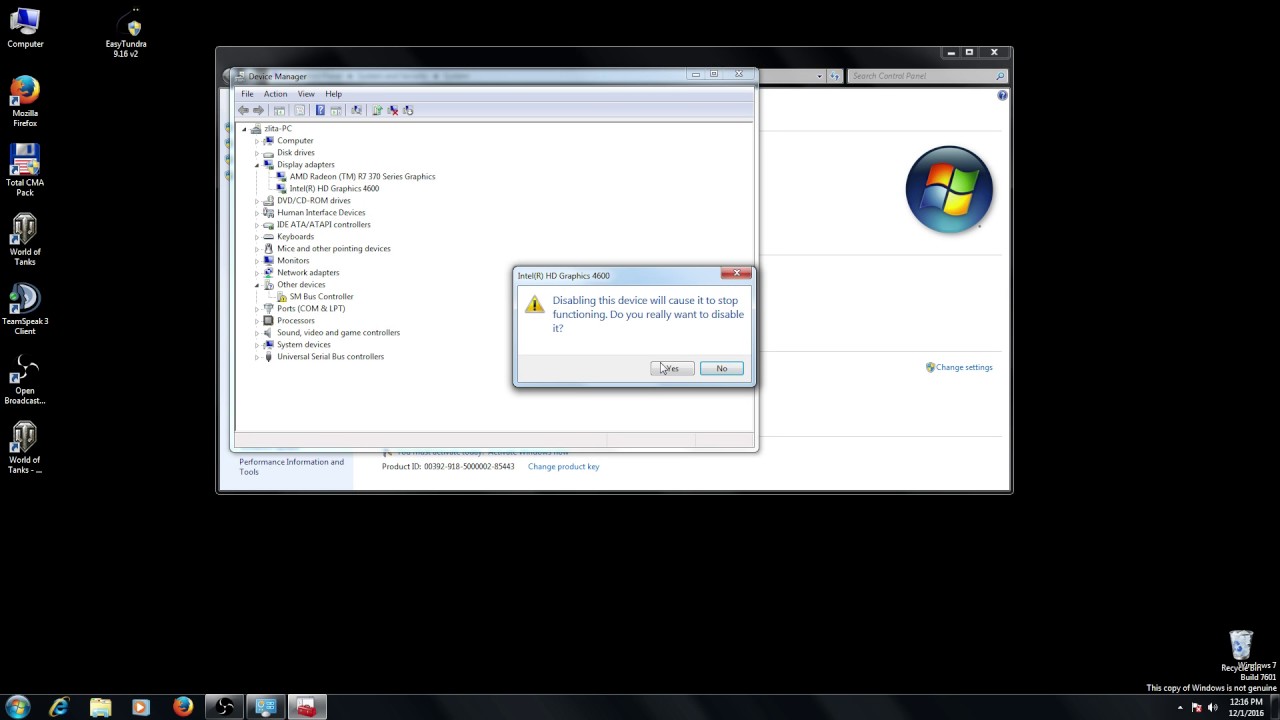
- Now that you are in safe mode, open the Device Manager.
- Look for embedded images.
- Right click on it and select Disable from the menu.
- Restart the computer and check if the black box is still there.
If you have both integrated and external graphics cards in your configuration and both are enabled, you may experience interference. Therefore, the best solution in this case would be to just turn off the integrated graphics card. Before disabling the integrated graphics card, we need to boot into safe mode to avoid potential problems.
Changing the brightness settings
- In Power Settings, find the current power plan and click Change Plan Settings.
- Then click the Change advanced power settings option.Advanced Power Settings
- Find the Display Brightness setting and make sure the display brightness is set to 99% or 98% when the device is connected to the network.
- Save the changes and restart the computer.
Another reason for the blinking black square on the screen may be an incorrect brightness setting. Setting the screen brightness to 100% when the device is connected will cause a problem, so it is better to use a lower value. Does troubleshooting Windows give you a headache? Here’s a quick guide to troubleshooting Windows problems. If you know of any other solutions or need additional help, please feel free to contact us using the comment box below. Do you have any problems? Repair them with this tool:
- Download this PC recovery tool with excellent reviews on TrustPilot.com (download starts on this page).
- Click on the Start Scan button to scan for Windows issues that may be causing the PC problems.
- Click Repair All to fix problems with patented technology (exclusive discount for our readers).
Restoro was downloaded by 0 readers this month. Not enough details. It’s hard to understand Other Contact an expert Take part in the discussion
Frequently Asked Questions
What are the black boxes that pop up on my screen?
After receiving the latest Windows 10 update, a user discovers that a black box pops up on their screen anytime they attempt to push the button to close a program or app they’re using. The black box is usually accompanied by a notification that it was blocked by the user’s security settings. The user can then click the notification to open the program or app and close it. However, the notification is still visible on the taskbar. When the user returns to the taskbar, the notification disappears.
There are many things that can cause the black box to pop up on your screen in Windows 10. When a black box pops up, it means a software is running in the background. As you already know, Windows 10 comes with a lot of built in features, like Wi-Fi and Bluetooth. So many features are running in the background which will cause the black box pop up.
How do I get rid of the black box on my screen?
Okay, you have a weird, black box, and you don’t know what’s going on. The only thing you can get rid of it is a command prompt. Then you will have to locate the file that will allow you to uninstall the annoying black box. The dreaded “black box” is a mysterious thing on your computer screen. It can be a window, icon or taskbar icon. It can appear on a locked screen, in the middle of a website or in a window. It appears when something is wrong with your computer, and it doesn’t appear when everything is working fine. It can appear as a black rectangle in Windows 10, or as a one-sided box with a unity-like arrow.


")


